

Patient assessment: Secondary survey
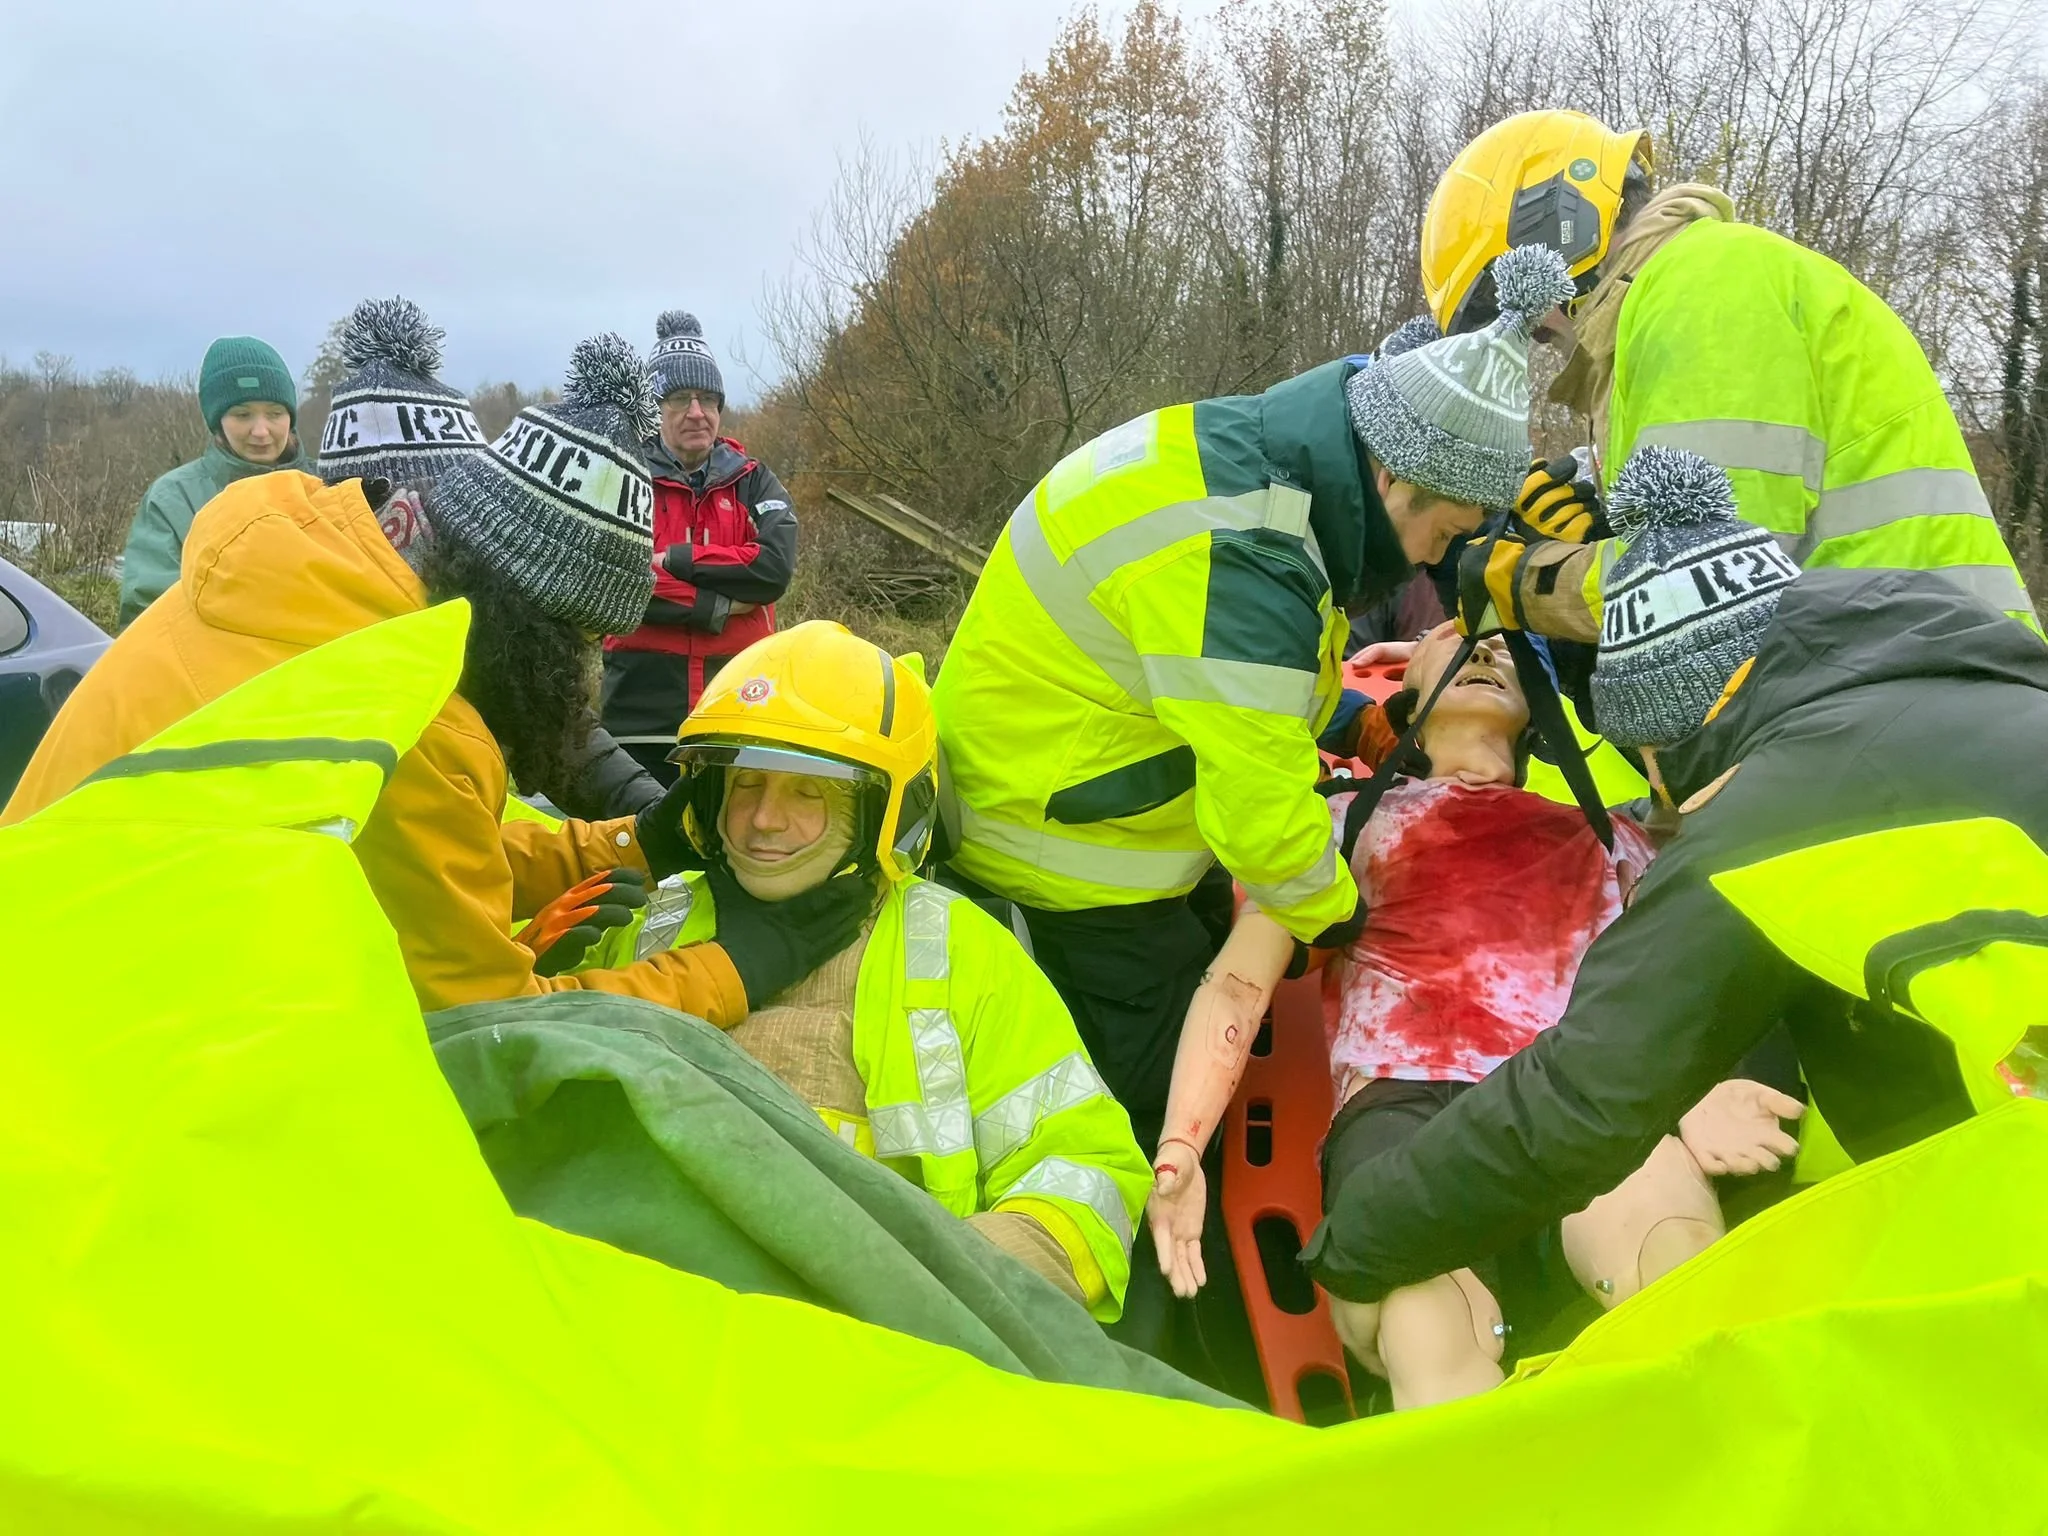
Figure 1: Vehicle extrication training by K2 Trainee EMTs and ECAs supported by the Northern Ireland Fire and Rescue Service (NIFRS).
A Practical Secondary Survey: Head-to-Toe Assessment in Pre-Hospital Care
The secondary survey is a structured, methodical head-to-toe examination performed once the primary survey (DRCABCDE) has been completed and immediate life-threats have been addressed. Its purpose is to identify additional injuries, subtle signs of serious pathology, and evolving clinical problems that may influence triage, treatment, and transport decisions.
If the patient is unconscious, has an unknown history, or there is suspicion of spinal trauma, spinal motion restriction should be maintained throughout, including during any log-roll.
Remember, the secondary survey/head to toe assessment is not just for patients who are unconscious - it is for anyone you suspect to have other wounds and injuries that are not obvious during initial presentation.
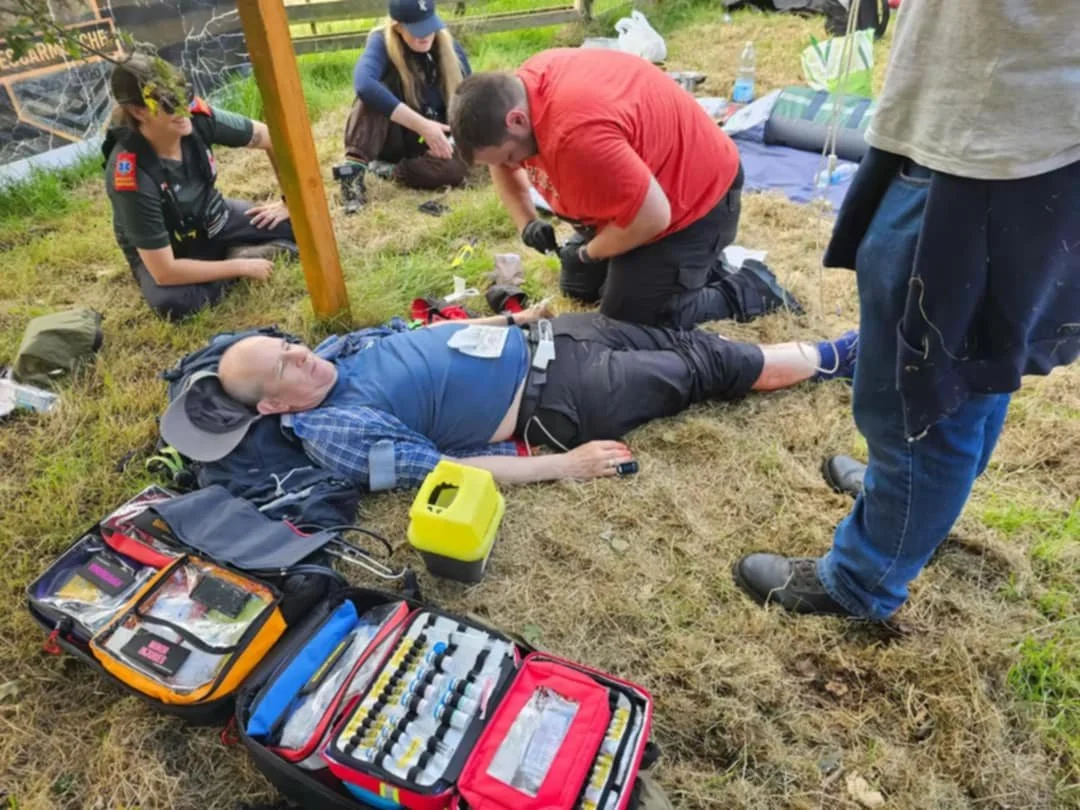
Figure 2: Secondary survey in action by K2 FREUC 5 Trainee EMTs.
General principles before you start
Maintain manual cervical spine control where indicated also known as Manual Inline Stabilisation (MILS).
Use a systematic, repeatable sequence such as the one suggested below.
If your gloved hands disappear, they get checked for blood i.e. when you palpate an area you can’t see due to the patient lying on their back or a colleague is performing MILS, you must check your hand for blood.
Any deterioration in the patient’s condition → return immediately to the primary survey (DRCABCDE).
And finally: no gloves, no love.
1. Head and scalp
Begin at the vertex of the skull, using both hands.

Figure 3: The vertex of the skull is the very top of the head.
Palpation
Assess for scalp lacerations, swelling, and bleeding
Feel for bogginess (suggestive of underlying skull fracture or haematoma)
Check skull stability with cautious but firm palpation
Signs of basal skull fracture
Post-auricular ecchymosis (Battle’s sign) – bruising behind the ears
Periorbital haematoma (raccoon eyes)
Otorrhoea – fluid leaking from the ears
Rhinorrhoea – fluid leaking from the nose
Cerebrospinal fluid (CSF) leakage, either alone or mixed with blood, is concerning. Blood alone is less specific.
Where time allows:
Halo sign (gauze test) – CSF separates from blood forming a clear ring
Glucose testing may help differentiate CSF from blood
In reality, these are often impractical pre-hospital; clinical suspicion matters more.
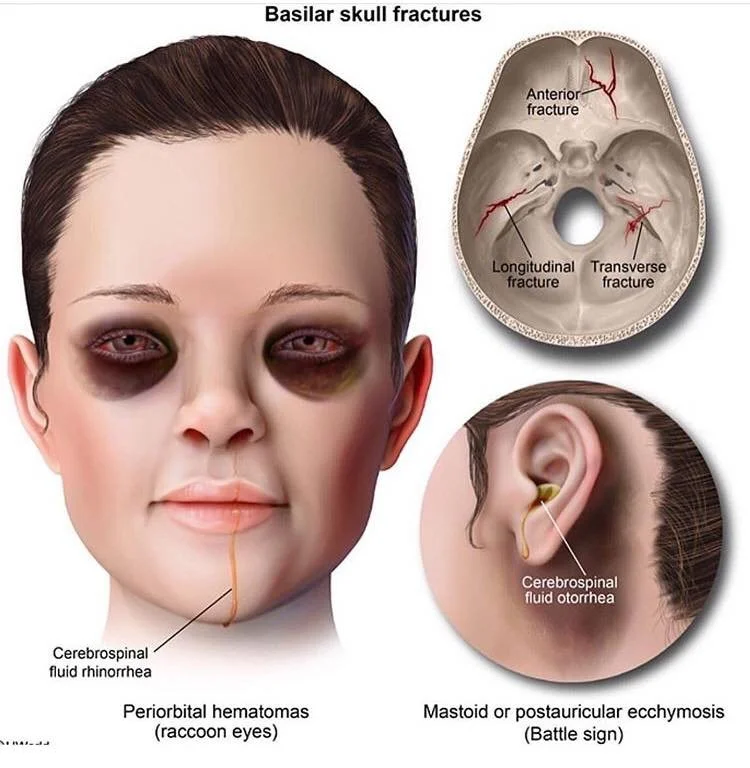
Figure 4: Signs of Basilar Skull Fracture.
Source: https://www.facebook.com/photo/?fbid=3045319562246586&set=a.825372004241364
2. Eyes and face
Eyes
Assess the eyes using the mnemonic PERRLA
I.e. are the Pupils:
Equal: The same size as each other. If not, is this normal for the patient? Do they have anisocoria? Whilst anisocoria is not a concern for pre-hospital staff, paired with recent head injury or other neurological concerns, this must be taken seriously at all times.
Round: Are the pupils both round? As with anisocoria, there are many reasons someone might not have non-round pupils but again, if paired with recent or suspected trauma, this could indicate a corneal injury and thus a sight threatening injury which must be dealt with ASAP.
Responsive: Are the pupils responding to Light and is there visible Accommodation i.e. the other eye responds too when shining a light in the other eye. NB: do not use bright lights such as a phone torch for this.
Accommodation: Accommodation also refers to the eyes ability to change shape and thickness to focus on objects at different distances. For close objects, the pupils constrict and the lens thickens, conversely for far away objects the pupils dilate and the lens becomes thinner. This can be tested by getting the patient to focus on your index finger near to their nose then pulling your finger further and further away while observing their pupillary response.
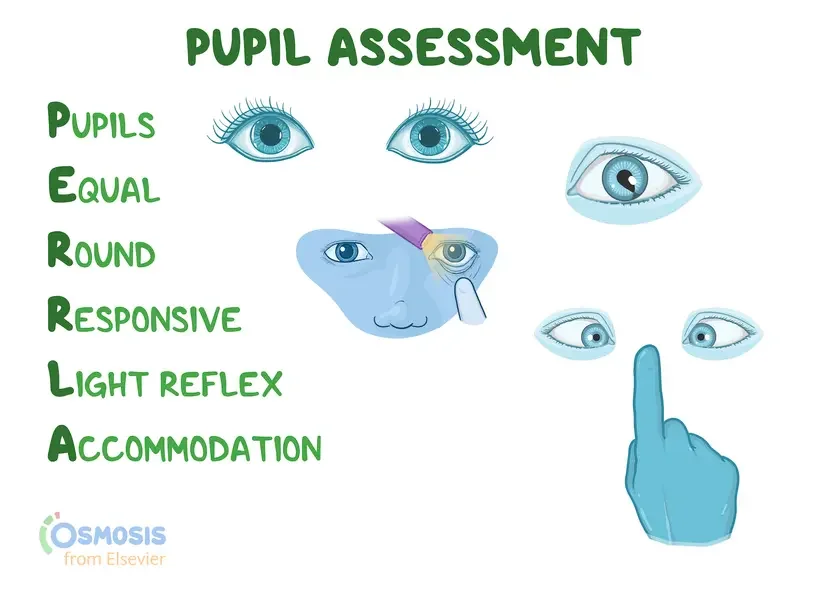
Figure 5: PERRLA Assessment.
Source: https://www.osmosis.org/answers/Perrla-pupil-assessment-acronym
Face and jaw
Inspect and palpate for:
Facial fractures.
Instability (?Le Forte Fracture).
Dental injury.
Check dentition and note loose or missing teeth - Plan A is to replace teeth back in socket if possible, Plan B is to place the tooth between the gums and cheeks (in conscious patients only), Plan C is to place in milk (not water, this will desicate the tooth through osmosis as water does not have the salt content needed to prevent this.
Always consider airway implications again during secondary survey.
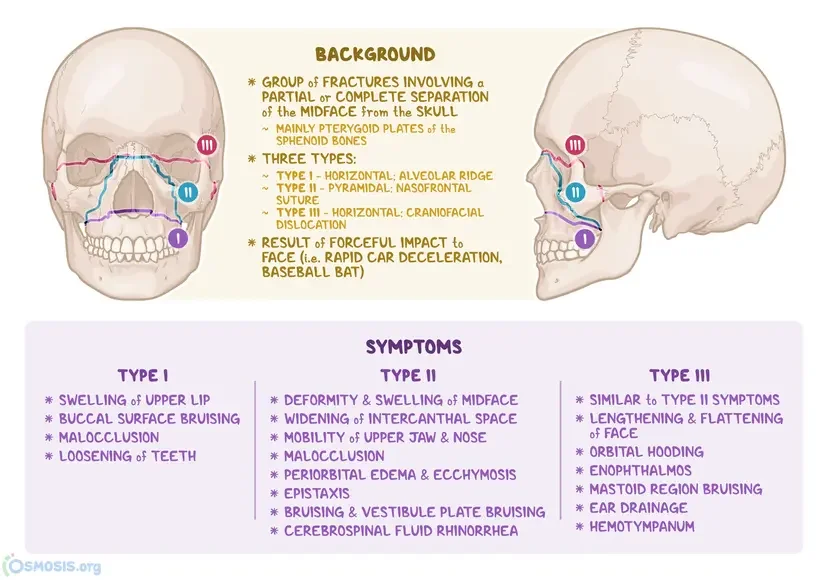
Figure 6: Le Fort Fracture types.
3. Neck
While maintaining spinal precautions if required:
Inspect for bruising, swelling, wounds, or deformity
Palpate gently for:
Midline cervical tenderness
Step deformities
Any abnormality should heighten suspicion of cervical spine injury. If you cannot feel or see any abnormality, the Canadian C-Spine rules can guide your decision making as to whether or not you should immobilise the patient. NB: The answers to these questions must be reliable, i.e. the patient is GCS 15, >18 years of age, is not intoxicated, and is showing no other signs of neurological compromise. That is to say, they must be a reliable source of information if we are to consider withholding immobilisation. If you are confused or unsure - ask for help! If senior clinical advice is not available, it almost always better to immobilise than not to if you suspect spinal trauma. See https://www.rcemlearning.co.uk/foamed/c-spine-skills-induction/ for more details on when immobilisation can cause harm.
4. Shoulders and upper limbs
Spring the shoulders gently to assess clavicles and shoulder girdle for stability
Inspect and palpate:
Clavicles
Upper arms
Elbows
Forearms
Wrists and hands
Assess long bones for SLIPDUCT:
Swelling: Did it appear slowly (>30 minutes or so), a sign of normal swelling. Did it appear quickly and/or appears to be quite bruised? A potential sign of internal bleeding.
Loss of function or movement: Has the patient lost their ability to use that limb normally? What is their normal range of motion? Could they return to normal daily activities?
Pain: Is the patient disabled by their level of pain? What are the characteristics of the pain? The mnemonic SOCRATES can help assess this:
Site: Can you point to where the pain is for me please?
Onset: When did this pain start and what were you doing when it started?
Characteristics: Can you describe the pain to me? Is it sharp, dull, pressure-like, throbbing? NB: It is important to initially allow the patient to try and describe it in their own words without prompting them with adjectives such as the above. Only prompt if they are struggling to articulate this.
Radiation: Is the pain radiating anywhere? Can you point it out to me?
Associated: Have you any other pain that started at the same time as this pain elsewhere on your body?
Timings: What ‘rota’ is the pain on? For example, is it 1 minute on, 1 minute off? 2 minutes on 5 minutes off? 1 day on 1 day off?
Exacerbation: Is there anything that exacerbates it or relieves it? Here you should think of things such as weight bearing, movement, positions such as lying down or sitting up.
Severity: On a scale of 1 to 10, how sore is it? The Comparative Pain Scale can be helpful here too as well as. The Wong Baker Pain Scale is also a useful tool for patients who cannot articulate their symptoms such as those suffering with dementia.
Deformity: Does the limb appear to be deformed? Can you compare it to the other limb if is has not been effected? Is the deformity normal for them?
Un-natural movement: Can the limb move in un-natural ways or beyond the normal plane of motion you would expect for that limb? I.e. forearms should not be able to freely bend or twist.
Crepitus: Crepitus is not always concerning, but new crepitus paired with recent trauma could indicate bones rubbing together and could be a sign of a fracture or dislocation.
Tenderness: Tenderness is different from pain in that tenderness is elicited with palpation. Is it generalised tenderness of an area - suggestive of soft tissue (muscle, tendon, or ligament) - or is it specific tenderness in an area - suggestive of hard tissue (bone or cartilage).
If any injuries are found, it is important to check the patient’s neurovascular status distal to the injury i.e. can they feel and move the limb after injury and do they have an adequate blood supply? Loss of neurovascular status is a medical emergency as this is limb threatening and evacuation should be expedited.
5. Chest and thorax
FLAPS TWELV is a good mnemonic to remember the following steps:
FEEL & LOOK: Using both hands together (see Figure 8a), move down the sternum and front of the chest, then once at the bottom of the sternum, fan outward with flattened hands to assess the entire thorax circumference, then move up to assess the axillae (armpits), then assess the back as much as possible without rolling using a large ‘X’ formation with your arms and hands. Do this to check for:
Tracheal deviation: A very late sign of tension pneumothorax.
Wounds: Assess the chest, neck, and junctional areas such as around the neck/collar area and both axillae for wounds, especially penetrating wounds. For junctional areas where you are unsure there is chest injury involvement: if it’s bleeding - pack it, if its not - chest seal. Bleeding likely indicates a neck or limb injury rather than a chest injury, but there may be overlap. The key takeaway is that you must not pack the chest cavity.
Surgical emphysema: Indication of air trapped in the soft tissues surrounding the neck and chest. If paired with recent trauma, indicates major trauma of the chest.
Laryngeal crepitus: Crepitus or feeling of hard tissues rubbing together when the larynx (voice box or ‘Adams Apple’) indicating significant trauma to the throat.
Venous distention: Distention of the jugular veins (where they are obviously visible like when a professional signer sustains a note like in figure ) either side of the neck.
Evaluate: all your signs and symptoms you have found so far and decide if needle thoracocentesis is required (reduced GCS paired with any of the above in major trauma).
Auscultate: if available, use your stethoscope to auscultate for:
Equal bilateral rise and fall of the chest - unilateral rise and fall may indicate tension pneumothorax.
Equal bilateral air entry and exit - unilateral reduced air entry and exit in the absence of unilateral rise and fall may indicate a simple pneumothorax or other less urgent pathologies such as pneumonia however in the context of trauma should always be assumed to be a pneumothorax and therefore a high index of suspicion for needle thoracocentesis should be held.
Bowel sounds - a sign of diaphragmatic rupture.
Percuss: This step often isn’t possible due to ambient noise, but if possible assess for the following:
Hypo-resonance: if combined with reduced air entry over the same area, suspect haemothorax and prepare for finger or tube thoracostomy if trained and authorised to do so or to assist a senior clinician.
Hyper-resonance: if combined with reduced air entry over the same area, suspect pneumothorax or tension pneumothorax if paired with any other symptoms from the TWELV mnemonic and prepare for needle thoracocentesis (chest decompression) if trained and authorised to do so or to assist a senior clinician.
Search: Search those junctional areas such as the collar area, and the axillae (armpits) again - these are high risk areas for wounds and chest injuries that are often missed! Remember: if it’s bleeding, pack it - if it’s not, seal it!
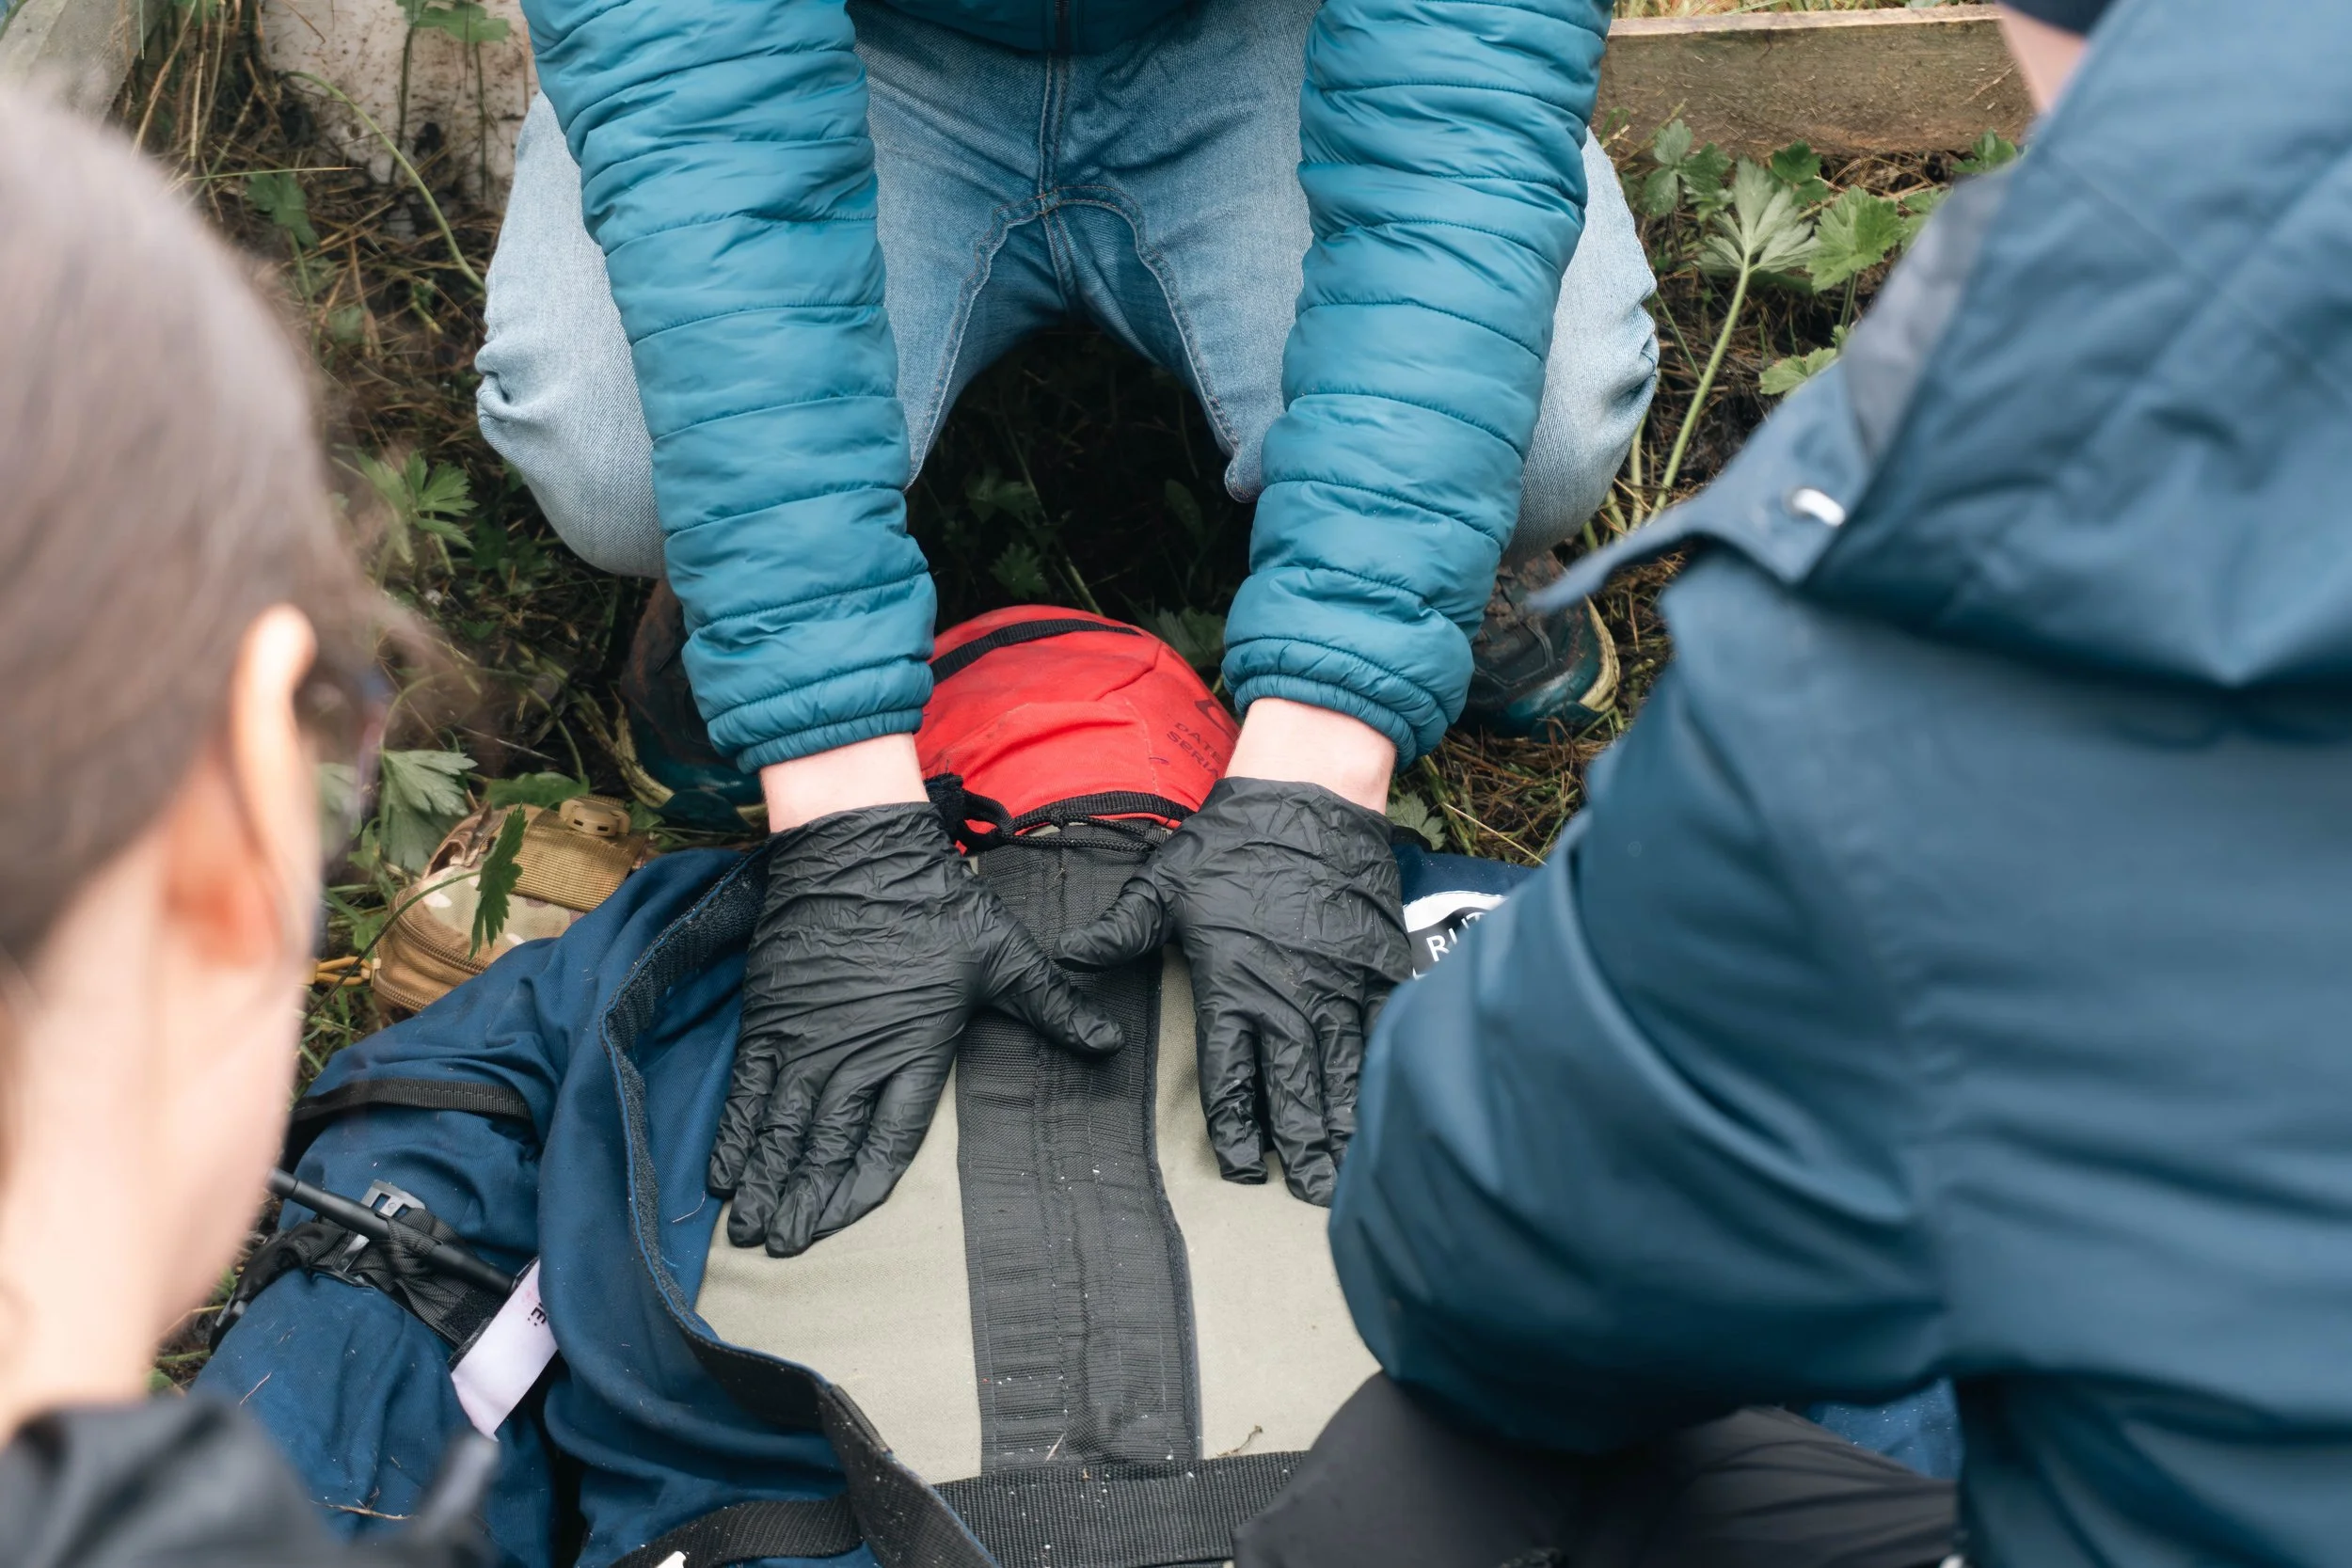
Figure 8a: Dr Scott McKee - MIRA graduate and K2 instructor performing the “the FEEL & LOOK” part of FLAPS TWELV in a trauma scenario.

Figure 8b: Chester Bennington displaying Jugular Venous Distention as he is increasing his intrathoracic pressure when sustaining a note thus blocking the drainage of his jugular veins. If this is seen in chest trauma, this could mean increasing intrathoracic pressure secondary to tension pneumothorax, haemothorax or both.
6. Abdomen
Inspect for:
Bruising (including seatbelt sign): a potential sign of internal bleeding.
Distension: a rigid abdomen may indicate internal bleeding.
Penetrating injury.
Undertake Manual Inline Stabilisation if the penetrating injury has crossed the midline as it may have struck the spine.
Palpate gently for:
Tenderness.
Guarding - not to be confused with the patient holding their abdomen, this is muscle rigidity of the abdominal muscles and is different from distention.
Rigidity - different from guarding, and may require a senior or experienced clinician to differentiate between the two.
Remember, abdominal injury may be occult. Patients can therefore appear well initially but begin to show a trend of deterioration over time. Constant assessment for circulatory compromise is therefore imperative and is easily done via a monitor set to cycle BP every minute with a minimum of a 3-lead ECG attached and pulse oximeter. Other signs such as tachypnoea in the absence of dyspnoea and an otherwise clear IPPA examination (to rule out respiratory compromise), pale colour and patient temperature dropping/feeling very cold.
7. Pelvis
Inspect first:
Leg position (splayed or externally rotated) such as in figure 9a.
Other signs of major trauma such as one of the factors in the Canadian C-spine Rules or other major or obvious fractures? Assume pelvic fracture and place a pelvic binder if available. See https://www.realfirstaid.co.uk/pelvic-splint on how to improvise a pelvic binder.
Do NOT spring the pelvis.
While assessing this area, look for indirect signs of other injuries:
Scrotal swelling (abdominal haemorrhage)
Perineal bruising (abdominal haemorrhage)
Priapism (suggestive of spinal cord injury)

Figure 9a: Patient with a ‘splayed’ right leg, a sign of pelvic fracture.
Figure 9b: Video of how to apply a pelvic binder.
Source: https://www.mcctn.org.uk/pelvic-binder-application.html
8. Lower limbs
Inspect and palpate:
Femurs: if fracture is suspected apply traction to effected limb if trained to do so. See Figure 10a.
Knees.
Lower legs: if open fracture, consider prophylactic broad spectrum anti-biotics if trained and authorised to do so due to heightened risk of infection - especially if evacuation to hospital is prolonged.
Ankles and feet: Ottawa ankle and Ottawa mid-foot rules are good tools to assist with imaging decision making. Babinski's response (see figure 10b) should also be tested at this stage with a negative test being good (toes plantarflex), a positive test being bad (toes dorsiflex) and no response likely meaning the casualty has had this since birth.
Check neurovascular status in both limbs.
Figure 10a: How to apply a traction splint.
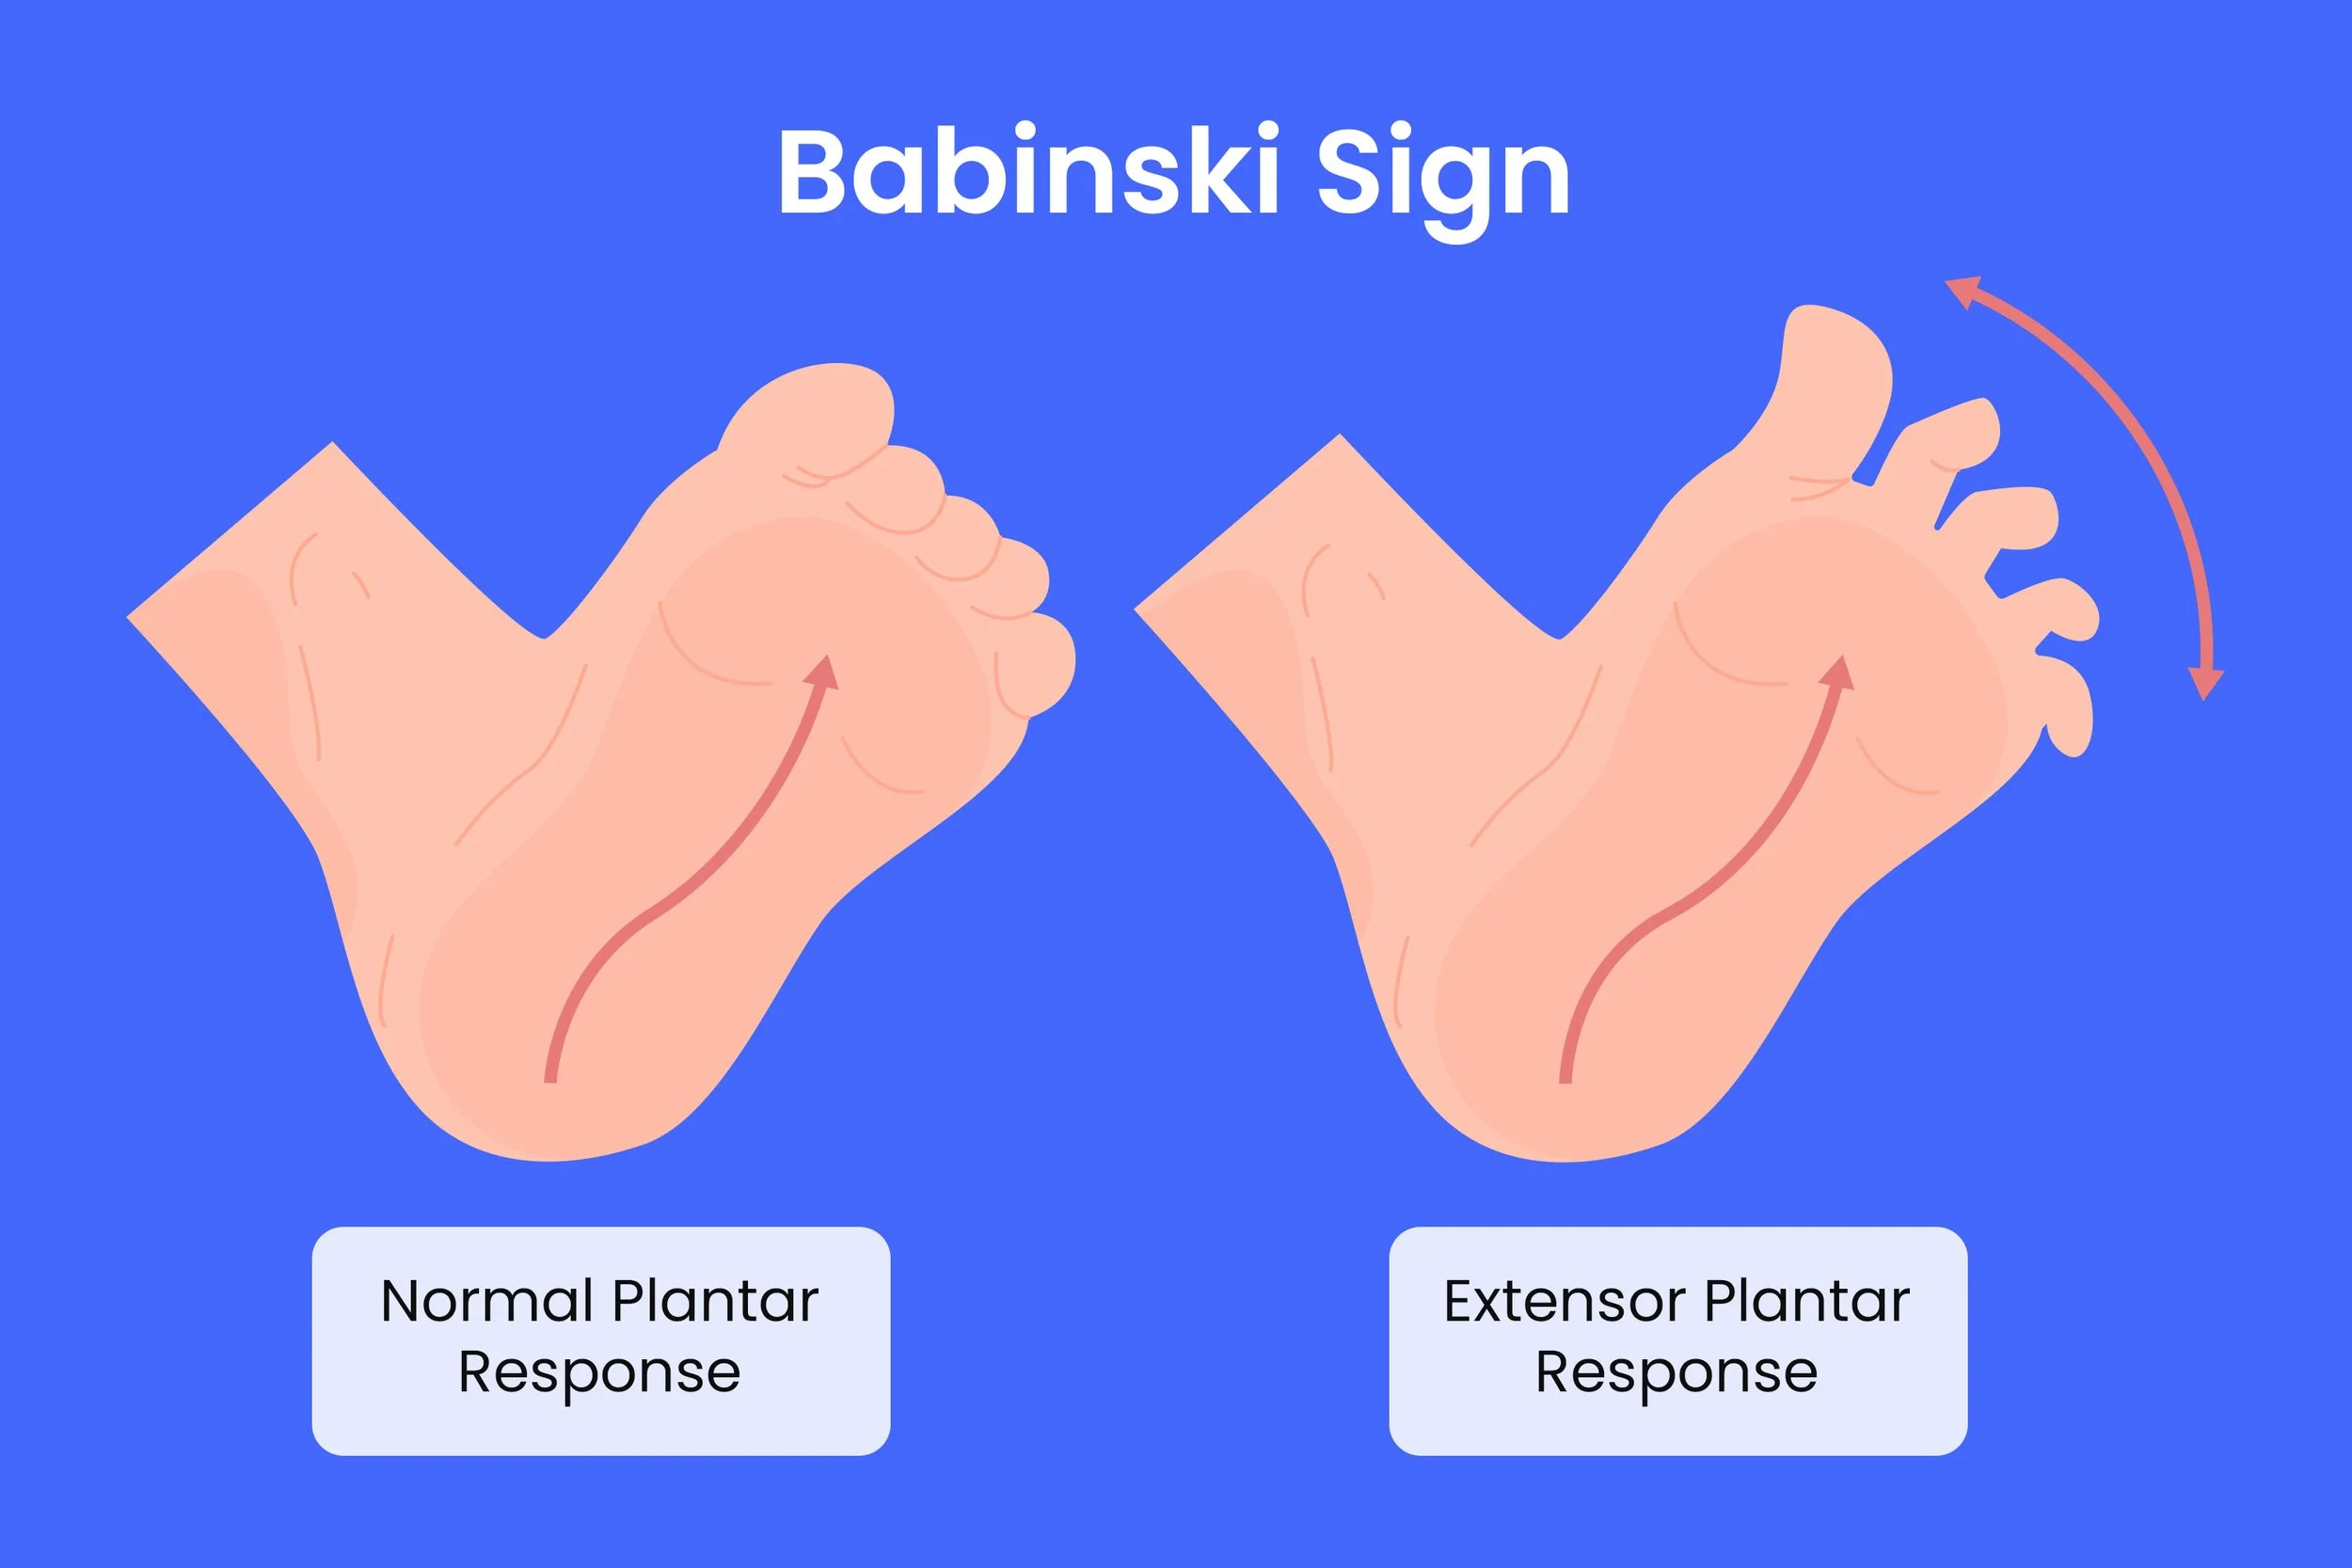
Figure 10b: Babinski’s response, what’s normal and what isn’t?
Source: https://www.healthcentral.com/condition/multiple-sclerosis/positive-babinski-sign
9. Posterior examination (log-roll if indicated)
See Figure 11 for video demonstration.
Only if:
Adequate personnel are available.
Spinal precautions are maintained.
Assess:
Entire back.
Spine alignment.
Wounds, bruising, bleeding.
Buttocks and posterior thighs.
Figure 11: How to log roll a patient.
Source: https://www.youtube.com/watch?v=-_OkMf_umyE
10. Reassessment and documentation
The secondary survey:
Is not a one-off.
Must be repeated.
Should inform:
Ongoing treatment.
Triage priority.
Transport destination.
Clinical handover.
Any deterioration → return to DRCABCDE immediately.
Key takeaway
The secondary survey is a deliberate, methodical head-to-toe assessment that complements the primary survey. When performed properly, it reduces missed injuries, improves triage decisions, and strengthens patient safety in pre-hospital care. It must be used sensibly however, as a full head-to-toe assessment on an end-of-life patient with no history of trauma, or a person alleging they have been sexually assaulted but do not report any obvious wounds or injuries may not be appropriate. Therefore the head-to-toe assessment paradigm is used mostly for trauma - both minor and major.
further reading
Abraham, MK (2021) Chapter 18 – Pelvic Trauma. AnesKey. Available at: https://aneskey.com/chapter-18-pelvic-trauma/ (Accessed: 3 January 2026).Aurora Health Care (no date) Knee, shoulder & elbow cracking or popping (crepitus). Available at: https://www.aurorahealthcare.org/services/orthopedics/conditions/crepitus
Center for Wilderness Safety (2021) Suspected Spinal Injury MOI. Wildsafe.org. Available at: https://wildsafe.org/curriculum-updates/suspected-spinal-injury-moi/
Chronic Pain Partners (no date) Comparative Pain Scale. Available at: https://www.chronicpainpartners.com/comparative-pain-scale/
FirstAidForFree.com (no date) First aid mnemonics: handy reminders. Available at: https://www.firstaidforfree.com/first-aid-training-resources/first-aid-mnemonics/
Ferguson, CM (1990) Inspection, auscultation, palpation, and percussion of the abdomen. In: Walker, HK, Hall, WD, and Hurst, JW (eds) Clinical Methods: The History, Physical, and Laboratory Examinations, 3rd edn. Boston: Butterworths. Available at: https://www.ncbi.nlm.nih.gov/books/NBK420/
Hacking, C., Bell, D. and Smith, D. (2015) Vertex. Radiopaedia.org. Available at: https://radiopaedia.org/articles/vertex
Haag, A. (2025) Le Fort fracture: What is it, diagnosis, and treatment. Osmosis.org. Available at: https://www.osmosis.org/answers/Le-Fort-fracture
Lee, K. (2025) What is the Babinski sign and how is it used? HealthCentral. Available at: https://www.healthcentral.com/condition/multiple-sclerosis/positive-babinski-sign
MDCalc (no date) Canadian C-Spine Rule. Available at: https://www.mdcalc.com/calc/696/canadian-c-spine-rule
MDCalc (no date) Ottawa Ankle Rule. Available at: https://www.mdcalc.com/calc/1670/ottawa-ankle-rule
MRU: Focus on Teaching & Learning (2019) Babinski reflex demonstration [YouTube video]. Available at: https://www.youtube.com/watch?v=-_OkMf_umyE
Osmosis (2025) PERRLA: Pupil Assessment Acronym. Available at: https://www.osmosis.org/answers/Perrla-pupil-assessment-acronym
Ophthalmology-Notes And Synopses (2020) [Photograph illustrating pupil assessment] [Facebook photo]. Available at: https://www.facebook.com/photo/?fbid=3045319562246586&set=a.825372004241364
Prometheus Medical (2021) Trauma pelvic binder application [YouTube video]. Available at: https://www.youtube.com/watch?v=ZQO0Vj1rD8M
RCEMLearning (no date) C-Spine skills induction. Available at: https://www.rcemlearning.co.uk/foamed/c-spine-skills-induction/
Real First Aid (no date) Pelvic splint: when and how to use one. Available at: https://www.realfirstaid.co.uk/pelvic-splint
Rescue Academy EMS (2022) Needle decompression tension pneumothorax [YouTube short]. Available at: https://www.youtube.com/shorts/FQC4qaQkB1E
The Free Dictionary (no date) Desiccate. Available at: https://medical-dictionary.thefreedictionary.com/Desicate
The Free Dictionary (no date) Dyspnoea. Available at: https://medical-dictionary.thefreedictionary.com/dyspnoea
The Free Dictionary (no date) Osmosis. Available at: https://medical-dictionary.thefreedictionary.com/osmosis
The Free Dictionary (no date) Tachypnoea. Available at: https://medical-dictionary.thefreedictionary.com/tachypnoea
Wong-Baker FACES Foundation (no date) Home – Wong-Baker FACES Pain Rating Scale. Available at: https://wongbakerfaces.org/
Disclaimer: This guide is provided for educational purposes only. It is not a substitute for certified first aid training. Although we base our information on current UK-approved guidelines (Resuscitation Council UK, St John Ambulance, etc.), performing first aid requires practice, training and judgement. If in doubt, always call emergency services (999 in the UK) and wait for professional responders. K2 International does not accept liability for actions taken by users based on this guide.